CETOL 6σ Tolerance Analysis Provides Valuable Insights for ABB SACE
New Ferryboat Emax 2 for the highest efficiency in panelbuilding
The customer
I.M.E.S.A. (based in Jesi, near Ancona – Italy) is a company that has been operating since 1972 in the field of electromechanical constructions.
IMESA is one of the leaders in Europe in the production of Low Voltage and Medium Voltage switchboards, SF6- insulated switch disconnectors for internal and external installations for MV, supervision and control systems as well as turnkey electrical systems.
The challenge
In the context of a diesel-electric state-of-the-art ferryboat, I.M.E.S.A. faced the challenge of creating a switchgear column – feeding main distribution and motors- able to:
- Be fully selective with downstream circuit-breakers (Tmax T4)
- Grant a service short-circuit breaking capacity of 50 kA @ 600V AC
- Have a horizontal bussing distribution system
- Realize the most compact solution compatible with the use of withdrawable circuit-breakers.
These requirements originate by the need for extremely compact switchgear, a typical requirement that can arise from a marine environment.
The ABB solution
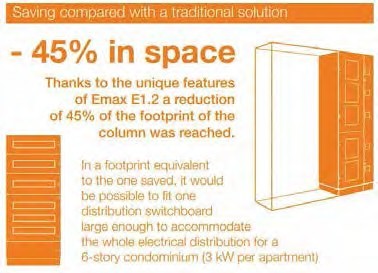
These requirements are really challenging. The first and second requirements clearly call for a category B circuit-breaker, while the third and the fourth are apter for a moulded-case circuit-breaker (able to be mounted in horizontal position, compact in dimension). No product other than ABB Emax E1.2 in the world of the Low Voltage Breakers could entirely fulfil the above requirements.
ABB Emax 1.2, the most compact size of the Emax 2 range of ACBs, is an innovative product, able to break up to 66 kA @ 440V AC (or 50 kA @ 690V AC) and to withstand 50 kA for one second.
Thanks to these unique features, IMESA was able to realize a high-efficiency switchboard, with five Emax E1.2 fitted in one column. The E1.2 chosen for this project are equipped with the new Ekip Touch trip units (LSI version).
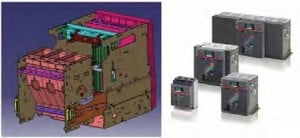
Figure 1 – Different versions of the Emax 2 product family
General description of the working methodology
Emax 2 is a complex product made up by hundreds of single parts assembled together that has several measurement requirements to satisfy. These requirements deal with assemblability, product quality and security and all of them refer to geometric quantities (i.e. the distance between two parallel planes and their relative orientation).
The measurement requirements depend on how the single parts are located and oriented with respect to the others: these information are provided by the contact conditions between adjacent parts and the geometric relations between features belonging to each single part. The complex three dimensional vectorial chain is based on the translation of the previous information into the numerical model. The definition of the output measures (requirements) close the tolerance chain.
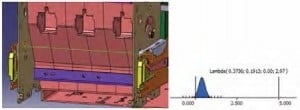
Figure 2 – Initial statistical distribution of the gap between joined guide-plates
If all parts were perfect (nominal shape) the chain would be univocally determined and could be solved by using any CAD tool. In reality both contact conditions and geometric features aren’t the ideal ones,because real geometric entities exhibit a certain dispersion with respect to the nominal value due to the imperfections inherent in manufacturing processes. As a consequence, the assembly outputs are no longer univocally determinable and outputs become dispersed as well.
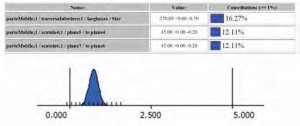
Figure 3 – Quantitative impact of variables on the result and its final statistical distribution
Designers control and limit the variability of the measure requirements (trying to keep them between the acceptance limits) by assigning proper dimensional and geometrical tolerances to the components: these tolerances should reflect the way parts are produced manufacturing process), assembled (assembly sequence) and the way dimensions are measured (quality controls).
The investigation of how tolerances affect the dispersion of the functioning measurements is carried out through a statistical approach.
Model development and targets
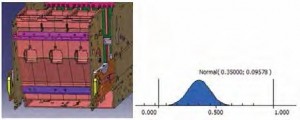
Figure 4 – Initial statistical distribution of the gap between frame and boxes
Aim of the analysis performed by EnginSoft was the validation of the Emax 2 project. Validation means checking that product requirements are within their area of acceptability. Such a need is due to the fact that the propagation of the tolerances in assembled products doesn’t guarantee compliance with these requirements even when all parts composing the assembly were produced respecting the tolerances assigned to them by the designer.
Among others, three requirements of particular relevance have been identified for this product:
- Requirement on the capability of the single parts to be assembled together (assemblability),
- Requirement on the product quality
- Requirement on security.

Figure 5 – Quantitative impact of variables on the result and its final statistical distribution
The procedure requires translating the above requirements in geometric entities in the CAD model, defining a range or threshold of acceptability for them and the assessment of their variability defined by the design (i.e. tolerances associated with nominal values).
The variability of functional measures is quantified after the analysis. The statistical analysis provides quantitative information on which take the most appropriate corrective actions and with minor impact on costs to improve the robustness of design. The entire procedure of construction of the model, its resolution, results visualization, their interpretation and appropriate corrective actions are handled by CETOL 6σ, a dedicated software developed by the Sigmetrix. CETOL 6σ automates the whole procedure following a standardized logical path remaining within the design environment, since it is fully embedded in the most popular CAD softwares.
Several practical advantages can be achieved: reduction of redesign cycles, prediction and reduction of the number of rejects, reduced reworks, fewer prototypes/samplings, dimensional control focused on the measures with major influence on product requirements, reduced “time to market”.
Obtained results and smart corrective actions
Assemblability requirement
The aim of the analysis is the prevision of potential issues during the installation of the movable part with respect to the fixed one. The assessment of this requirement is based on the overall dimensions of the two mating parts and their difference.
The result obtained using the design specifications highlights a low probability (Fig. 2, approximately 3 products every 100) to get a negative gap between the supports and the guides of the movable part: this results in possible interferences and thus noncompliances during assembly phases.
The sensitivity analysis is a powerful tool that allows the identification of the dimensions and tolerances that, within the dimensional chain, have the greatest influence on the mean value and the width (standard deviation) of the resulting statistical distribution. The variables with the highest influence on the functional measure were found to be the tolerances associated with the thickness of the guide plates. They directly affect the width of the statistical distribution representing the gap in the mating.
The reduction of only two tolerances among the thousand in the model has allowed the vanishing of the non-compliances.
Product quality requirement
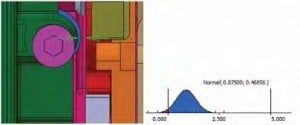
Fiure 6 – Initial statistical distribution of the distance between the shutters and the external wall
The aim of the analysis is the quantitative assessment of the gap between the plastic boxes held together and the frame of the movable part. During the life of a circuit breaker stressful condition can be encountered, i.e. high short circuit current passing through the breaker, when this happen the position of the phases relative to each other and to the main structure is crucial to the performance. We must ensure a perfect fit in order to maximize results and reduce risks.
The result obtained using the design specifications highlights a high width for the output statistical distribution with respect to the ideal condition of operation, i.e. a mean value of zero for the gap and a null width of the distribution around the mean value.
Now, the targets to achieve are: shift the mean value of the distribution towards lower values and reduce its width. As previously happened, tolerance analysis has allowed the identification of the variables with the greatest influence on the final requirement: results from sensitivity analysis have provided all the necessary information to act in a targeted manner. The tolerances belonging to the width of each box have the major influence on the dispersion of the gap value around the nominal, as a consequence it is on these that it was decided to take action. The study has increased the robustness of the design through the reduction of only two tolerances (among thousands in the model) along with the change of a nominal value.
Security requirement

Figure 7 – Quantitative impact of variables on the result and its final statistical distribution
The aim of the analysis is the detection of possible risks of locking of the shutters during the extraction of the movable part. The closure of the shutters must always be ensured to avoid contact between the maintenance engineers and the parts under voltage of the switch. The results obtained using the design specifications shows a potential number of non-compliance of approximately 5%. For these components the external wall of the shutters is in contact with the sliding guides causing friction and the subsequent locking. The sensitivity analysis has identified the tolerances associated with the placement of two holes as the variables of greatest influence on the dispersion of the gap around the mean value. The previous information could be used to undertake the appropriate corrective actions when products and parts are only on the drawings, avoiding their discovery during the prototyping phase and the costs associated with the production, quality controls and reworks. The reduction of only two tolerances among the thousands in the model allowed the avoidance of the non compliances for the requirement under investigation.
Conclusions
The activity performed in collaboration with EnginSoft has allowed ABB to meet all the design requirements for the product under investigation. Through the analysis of the propagation of the tolerances within the dimensional chain it has been possible to identify the dimensions and tolerances with the major impact on the functional measurements and therefore to act in a targeted way for the resolution of potential non-compliances, avoiding the generalization of their treatment. The resulting benefits are multiple, meeting objectives: reduction of the redesign cycles, savings on scraps and reworks, reduced number of prototypes, reduced “time to market”.
Giulio Tribulato – ABB SACE
Enrico Boesso – EnginSoft
CETOL 6σ and Tolerance Analysis
FN Manufacturing is a precision manufacturing facility with a rich military heritage as a small arms supplier to the U.S. Military and ninety other countries around the world. They offer services to aerospace, firearms and other industries requiring exacting tolerances and tight quality control. Capable of taking a design from concept through distribution, the quality and reliability expected of military applications carries over into everything they build.

